DO you know your earth pin from neutral? If not, you aren’t alone.
Most of us don’t know how to do the most basic DIY jobs such as wiring a plug or unclogging a sink, a study has found.

The research said a third of adults are clueless about tinkering with car engines and nearly half have no idea how a home’s lights come on.
Half of those polled claim failing science exams at school led to their lack of handiness in the home. But it is actually much simpler to do odd jobs at home than most of us think.
From putting up a shelf to changing oil in the car, This Morning’s DIY expert Georgina Barnett explains how to Thea Jacobs.
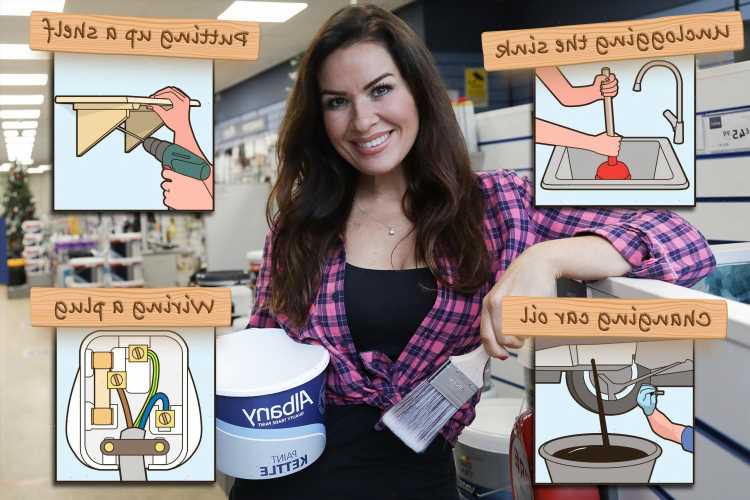
UNCLOGGING THE SINK
START with a household plunger. Fill the sink with water and place the plunger over the sinkhole.

Plunge it ten or so times and it should clear. Flush it through with warm water.
If this does not work, scoop out any standing water and put an entire kettle of boiling water down the sinkhole.
If it doesn’t drain, let it cool and scoop it out and try again.
Repeat three times.
Failing that, pour some Spirits of Salts – a weak hydrochloric acid – down the sinkhole and leave for 20 minutes.
But make sure you wear gloves, clear the room and mind your chrome fittings.
If that has not done the job, it may be time for a wire coat hanger, which you flatten and poke down the hole to move the clog. You may pull some out on the wire.
Still blocked? You will have to access the U-bend under the sink. With a bucket underneath, unscrew the fixing.
But only do this if you can put it back together.
PUTTING UP A SHELF
WORK out where the shelf is to go, making sure there are no electrical wires or plumbing in the wall behind it.

Choose the appropriate fixing – if you have plasterboard you will need a butterfly or anchor fixing. If it’s brick or concrete, you will need plastic wall plugs and screws.
Assuming it is a bracket shelf, hold it up on the wall in position using a spirit level to make sure it is level.
Draw a line where the bottom of it will sit. Mark both ends and where the brackets will sit (usually 1-2cm from the end).
Then hold the brackets in position and place a pencil mark through the screw hole on the wall.
Use a hammer drill and masonry bit to make appropriate holes for your fixings.
Screw in your anchor fixings or the wall plugs followed by screws. Screw the shelf to the brackets.
CHANGING A LIGHT BULB
MAKE sure that the light switch is off or turn the electricity off at the fuse box and allow the old bulb to cool down if it has been on.

You may need to remove a shade first then take out the old bulb, which will tell you what type you need – it will usually be a screw or bayonet one .
If it’s a bayonet, you twist and lock it into place. A screw bulb you screw in. Fit the lampshade again if necessary.
If you are changing a spotlight, with the most common type, you need to remove a metal ring around the bulb and fit the new one by aligning pins and clicking it into place. Then put the metal ring back in position.
For some spotlights, it may be a simple case of removing the old by unscrewing it counter-clockwise and screwing in the new one clockwise.
Don’t forget to turn the mains back on.
CHANGING OIL IN THE CAR
CHECK with your car’s handbook or online to see which type of oil is best and how much to use (the average car takes 5-6 litres) and what type of filter you need.

You may need to crawl under your car to find the drain plug which is attached to the oil pan at the bottom of the engine.
You must use a jack AND axle stands to do it safely. Place a large container underneath the plug and unscrew it. Then locate the oil filler cap and unscrew that and the oil filter. Dry it, put in newspaper and bin.
Take the new filter and screw it in place where the old one was.
Wipe around the connection for the oil drain plug and screw the plug back on.
Pour all but a quarter of the oil into the correct hole and screw shut.
Turn the engine on for 30 to 60 seconds. Turn off the engine and wait for ten minutes and check for leaks. You should take the old oil to a recycling bank.
Remove the dipstick, wipe it clean and add more oil until you reach the “full” marker on the dipstick.
FIXING A HOLE IN THE WALL
FIRST of all you must clear the hole of any loose particles.

You can do this with a fine brush or a vacuum cleaner. Then apply some ready-mixed filler to the hole.
It should be slightly overfilled to ensure that it’s completely full.
Then use a putty knife to smooth it over, making sure that there are no gaps.
If it’s a larger hole you are fixing you can either use large hole filler, or some hole repair gauze and then some filler.
Use a damp cloth to remove any excess around the hole and leave to dry.
Check the instructions to see how long it takes for the filler to dry – this should typically be around one or two hours.
Then sand it down so it’s smooth with the wall and it is ready to be painted over.
WIRING A THREE PIN PLUG
START by unscrewing and removing the cover of the plug.

Cut the old plug off the cable and strip each wire with a wire stripper or sharp knife so there is about 2cm of bare wire.
Most modern plugs are sealed units so just cut the wire.
Identify the three pins as earth, live and neutral – this should be clearly labelled.
Attach the appropriate wire to each pin. When looking at the plug from above, the green and yellow wire goes to the Earth pin at the top, the brown wire goes to live pin on the right and blue wire goes to the neutral pin on left.
It is crucial you follow and double check this.
Screw the cover back on and it should be ready to plug in, but only do so if you are confident with what you have done.
Not all electrical appliances – many lights for instance – have an earth.
Source: Read Full Article